DWA (Alarmfernbedienung mit integrieten Schlüssel): Unterschied zwischen den Versionen
KKeine Bearbeitungszusammenfassung |
|||
| Zeile 40: | Zeile 40: | ||
This will serve as your guide to ensure you leave enough of the key sticking out when your finished (Trust me here). | This will serve as your guide to ensure you leave enough of the key sticking out when your finished (Trust me here). | ||
1. - Nimm den Metallteil des Schlüssels und stecke ihn in die Zündung deines Motorrads, drehe ihn, um | |||
sicherzustellen, dass er weit genug drin ist … nun beachte wie weit er hereingeht und markiere dies mit einem | |||
Anreißer / Stift genau über der Kante der Plastikverkleidung des Schlüssels. Dies wird dir als Orientierungshilfe | |||
dienen, um sicherzustellen, dass du genug vom Schlüssel herausstehen lässt, wenn du fertig bist | |||
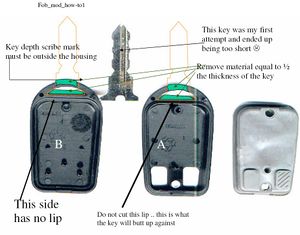
2 – Take the fob (remote) apart and remove the electronics package (Refer to fob_mod_how-to1 below). Place the key with the scribe mark over the button side fob piece (Side A). Next, mark the key so that it can be cut / ground / filed to fit. Use the outside edge of the lip as your guide to mark where to cut the key. | 2 – Take the fob (remote) apart and remove the electronics package (Refer to fob_mod_how-to1 below). Place the key with the scribe mark over the button side fob piece (Side A). Next, mark the key so that it can be cut / ground / filed to fit. Use the outside edge of the lip as your guide to mark where to cut the key. | ||
Check to make sure you’ve left enough of the key exposed (refer to depth scribe). | Check to make sure you’ve left enough of the key exposed (refer to depth scribe). | ||
2. – Nimm die Fernbedienung auseinander und entferne die Elektronikpakete (vgl. fob_mod_how-to1). | |||
Platziere den Schlüssel mit der angerissenen Markierung über der Knopfseite der Fernbedienung (Seite A). Als | |||
nächstes markiere den Schlüssel so, dass er passend angeschnitten werden kann. Benutze die Außenkante der | |||
Lippe als Orientierungshilfe, um die Schneidstelle zu markieren. Kontrolliere nochmals, dass du genug vom | |||
Schlüssel (Metallteil) übrig hast nach dem Abschneiden (siehe Markierung unter 1.)) | |||
3 – Cut the key such that you are left with a straight edge that is square with the key. This edge will rest against the lip on the fob piece with the button holes (piece A) and will act as a reference point for cutting the fob. | 3 – Cut the key such that you are left with a straight edge that is square with the key. This edge will rest against the lip on the fob piece with the button holes (piece A) and will act as a reference point for cutting the fob. | ||
3. – Schneide den Schlüssel so ab, dass du eine gerade Kante, die rechtwinklig zum Schlüssel ist, hast. Diese | |||
Kante hält an der Lippe des Fernbedienungsstücks mit den Knopfaussparungen (Teil A) und dient als | |||
Referenzpunkt, um die Fernbedienung zurechtzuschneiden. | |||
4 – Now take the cut key, and placing it againist the lip of fob piece ‘A’, use the scribe (or knife) to mark the plastic after centering it (don’t worry about piece B right now). | 4 – Now take the cut key, and placing it againist the lip of fob piece ‘A’, use the scribe (or knife) to mark the plastic after centering it (don’t worry about piece B right now). | ||
4. - Nimm den abgeschnittenen Schlüssel und platziere ihn gegen die Lippe des Fernbedienungsteils A. Benutze | |||
den Anreißer und markiere das Plastik nachdem du es zentriert hast. (Mach dir noch keine Gedanken über Teil | |||
B zu diesem Zeitpunkt) | |||
| Zeile 56: | Zeile 75: | ||
Place the key in the cut from time to time to see how it’s going. When your finished (happy with the cut), leave the key in it’s ultimate location. | Place the key in the cut from time to time to see how it’s going. When your finished (happy with the cut), leave the key in it’s ultimate location. | ||
5. – Plastikstück A zurechtschneiden…GEHE KONSERVATIV vor. Denk daran, dass du innerhalb deiner | |||
Markierungen schneidest. Diese Schnitte beeinflussen, wie gut der Schlüssel im Plastik hält…besser zu fest als | |||
zu locker, du willst ja nicht, dass der Schlüssel in der Fernbedienung wackelt, wenn du fertig bist. Als ich das | |||
tat, benutzte ich #2 xacto Messer, um mit den Schnitten zu beginnen und die Tiefe zu ermitteln. Dann bin ich | |||
mit dem Meißel dran und habe das Material sauber entfernt. | |||
Platziere den Schlüssel immer wieder in die Schnittstelle, um die Passgenauigkeit zu prüfen. Wenn du fertig | |||
bist (zufrieden mit dem Schnitt), lass den Schlüssel in seiner endgültigen Position. | |||
| Zeile 66: | Zeile 93: | ||
At this point you should be able to install the key and assemble the fob halves. Depending on how tight you were able to make it, this may be where you want to stop…but I doubt it! | At this point you should be able to install the key and assemble the fob halves. Depending on how tight you were able to make it, this may be where you want to stop…but I doubt it! | ||
5a. – Plastikstück B zurechtschneiden…Füge die beiden Fernbedienungshälften mit dem Schlüssel in Stück A | |||
zusammen. Versichere dich, dass sie genau ausgerichtet sind und markiere an Stück B, wo es mit dem Schlüssel | |||
in Kontakt kommt. Dies ist nun dein Referenzpunkt für die Schnitte, die an Teil B zu tätigen sind. Nimm die | |||
Fernbedienung auseinander. Platziere den Schlüssel auf Teil B der Fernbedienung unter Beachtung der | |||
Markierungen auf dem Plastik. ACHTUNG – der Schlüssel kann asymmetrisch sein…sei dir sicher, dass du die | |||
zugehörige Seite von Teil B verwendest. Schnitze nun den Plastikteil, der entfernt werden muss, | |||
heraus….denke daran, dass du innerhalb der Markierungen arbeitest | |||
Zu diesem Zeitpunkt solltest du in der Lage sein, den Schlüssel einzusetzen und anschließend die beiden | |||
Fernbedienungshälften zusammenzubauen. Abhängig davon wie fest der Schlüssel sitzt, kann dies der Punkt | |||
sein, an dem du aufhören möchtest | |||
| Zeile 72: | Zeile 111: | ||
Use the bolt cutter to cut an old key or coin into the approximate shape to fit inside the ¼ moon opening on the fob. This will end up being 2 small pieces of metal that will be tapered to match the shape of the fob | Use the bolt cutter to cut an old key or coin into the approximate shape to fit inside the ¼ moon opening on the fob. This will end up being 2 small pieces of metal that will be tapered to match the shape of the fob | ||
Once their cut initially, use a file or belt sander (what I used) to work the piece until it fits snugly into the ¼ moon openings. This can be tedious but worth the effort. | Once their cut initially, use a file or belt sander (what I used) to work the piece until it fits snugly into the ¼ moon openings. This can be tedious but worth the effort. | ||
6 – Herstellung von Befestigungen, um alles sicher zusammenzuhalten. | |||
Benutze den Bolzenschneider, um einen alten Schlüssel oder eine Münze in Stücke zu schneiden, die in die | |||
Viertelmondöffnung der Fernbedienung passen. Dies endet in 2 kleinen Metallstücken, welche so angeschrägt | |||
werden, dass sie zur Fernbedienungsform passen. Nachdem diese einmal geschnitten sind, benutze eine Feile | |||
oder Bandschleifer (was ich benutzte), um das Teil so zu bearbeiten, dass es gut in die Viertelmondöffnungen | |||
passt. Dies kann ermüdend sein, ist aber den Aufwand wert. | |||
| Zeile 79: | Zeile 125: | ||
A note about the glue used … this needs to be something thick that won’t run much. JB weld fits the bill here. Another interesting thing about JB weld is that it didn’t stick to the plastic wrap which I thought was curious. | A note about the glue used … this needs to be something thick that won’t run much. JB weld fits the bill here. Another interesting thing about JB weld is that it didn’t stick to the plastic wrap which I thought was curious. | ||
7 – Nun musst du die Befestigungen in den Fernbedienungshälften verkleben. Siehe hierzu „Gluing in the | |||
Stiffeners“ Diagramm. Füge den Schlüssel in einer Plastikhülle zwischen die beiden Fernbedienungshälften ein. | |||
Dies wird verhindern, dass etwas dauerhaft zusammenklebt. Die Verwendung eines 2-Komponenten Epoxy- | |||
Klebers zum Einkleben der Befestigungen wird empfohlen. Sei sicher, dass du in alle Hohlräume unter den | |||
Befestigungen ausfüllst, um den nötigen Halt zu gewährleisten. Möglicherweise willst du eine Hälfte nach der | |||
anderen machen, um sicherzustellen, dass kein Kleber an die Außenseite der Fernbedienung kommt. | |||
Eine Anmerkung zum verwendeten Kleber…er muss dickflüssig sein. JB weld hat sich an dieser Stelle | |||
bewährt. Eine andere interessante Sache an JB weld ist, dass er nicht an der Plastikhülle klebte, was ich kurios | |||
fand. | |||
| Zeile 84: | Zeile 141: | ||
Next drill out a slightly larger hole through the top half stiffener down through the body of the fob but DO NOT PENETRATE THE BOTTOM STIFFENER. | Next drill out a slightly larger hole through the top half stiffener down through the body of the fob but DO NOT PENETRATE THE BOTTOM STIFFENER. | ||
Next run the 2-56 (or equiv.) tap down through the bottom stiffener. | Next run the 2-56 (or equiv.) tap down through the bottom stiffener. | ||
8 – Mit der zusammengebauten Einheit und den verklebten Befestigungen, bohre ein kleines Loch (passend für | |||
2-56 oder äquivalente Maschinenschraube) durch den Viertelmondbereich. Dies wird aufgrund der Winkel | |||
schwierig werden. Als nächstes bohre ein leicht größeres Loch durch die obere Befestigung bis durch den | |||
Fernbedienungskörper an sich, aber AUF KEINEN FALL DIE UNTERE BEFESTIGUNG DURCHBOHREN. | |||
Als nächstes drehe den Gewindeschneider durch die Bodenbefestigung. | |||
Put in a new screw … install the original screw … tighten everything up and go back to the belt sander ( or fine file ). | Put in a new screw … install the original screw … tighten everything up and go back to the belt sander ( or fine file ). | ||
Drehe eine neue Schraube hinein…installiere den Originalschlüssel….ziehe alles fest und geh an den | |||
Bandschleifer (oder feine Feile). | |||
Sand everything flush. | Sand everything flush. | ||
Schleife alles bündig. | |||
Your Done! | Your Done! | ||
Vielen Dank für die Überstezung an Günther (LT Forum) | |||
Aktuelle Version vom 2. November 2012, 07:36 Uhr
Integrated Alarm Fob / KEY for BMW Motorcycle
Dan McGee Nov 18, 2002 mailto:edmcgee@sbcglobal.net


Tools I used / Stuff you’ll need
- Xacto knife w/ #2 blade (classic blade)
- Xacto knife w/ #18 Heavyweight Chiseling blade
- Small Belt sander
- Small drill press
- Pliers
- Small Phillips screw driver
- Plastic Wrap (from the kitchen)
- JB Weld (Made in or near Sulpur Springs Texas ... I don't know what's in JB weld but it's like magic in a tube!)
- Bolt cutter
- An old Brass Key or suitable coin (to fabricate side stiffeners)
- Very small drill bit (for 2-56 tap)
- 2-56 Tap (for making machine screw threads)
- Wallet key for your beemer
- Alarm Fob
- Metal Scribe (small) … could also use an old exacto knife to score metal…just use it backwards.
Time: I did this over the course of 2 weekends and probably worked on it about 2-3 hours (actual work time … I tend to ponder things a lot as I work through issues).
Note: the drill press is optional as is the belt sander. As a hobby I build R/C aircraft and have ready access to these tools. Everything I did can be done with hand tools and a bit of paitence (you’ll need that regardless).
1 - Take your wallet key and put it in the ignition on your bike, turn it to ensure it’s in far enough … now take note of how far it goes in and mark it with the scribe just above the face of the key slot opening.
This will serve as your guide to ensure you leave enough of the key sticking out when your finished (Trust me here).
1. - Nimm den Metallteil des Schlüssels und stecke ihn in die Zündung deines Motorrads, drehe ihn, um
sicherzustellen, dass er weit genug drin ist … nun beachte wie weit er hereingeht und markiere dies mit einem
Anreißer / Stift genau über der Kante der Plastikverkleidung des Schlüssels. Dies wird dir als Orientierungshilfe
dienen, um sicherzustellen, dass du genug vom Schlüssel herausstehen lässt, wenn du fertig bist
2 – Take the fob (remote) apart and remove the electronics package (Refer to fob_mod_how-to1 below). Place the key with the scribe mark over the button side fob piece (Side A). Next, mark the key so that it can be cut / ground / filed to fit. Use the outside edge of the lip as your guide to mark where to cut the key.
Check to make sure you’ve left enough of the key exposed (refer to depth scribe).
2. – Nimm die Fernbedienung auseinander und entferne die Elektronikpakete (vgl. fob_mod_how-to1). Platziere den Schlüssel mit der angerissenen Markierung über der Knopfseite der Fernbedienung (Seite A). Als nächstes markiere den Schlüssel so, dass er passend angeschnitten werden kann. Benutze die Außenkante der Lippe als Orientierungshilfe, um die Schneidstelle zu markieren. Kontrolliere nochmals, dass du genug vom Schlüssel (Metallteil) übrig hast nach dem Abschneiden (siehe Markierung unter 1.))
3 – Cut the key such that you are left with a straight edge that is square with the key. This edge will rest against the lip on the fob piece with the button holes (piece A) and will act as a reference point for cutting the fob.
3. – Schneide den Schlüssel so ab, dass du eine gerade Kante, die rechtwinklig zum Schlüssel ist, hast. Diese Kante hält an der Lippe des Fernbedienungsstücks mit den Knopfaussparungen (Teil A) und dient als Referenzpunkt, um die Fernbedienung zurechtzuschneiden.
4 – Now take the cut key, and placing it againist the lip of fob piece ‘A’, use the scribe (or knife) to mark the plastic after centering it (don’t worry about piece B right now).
4. - Nimm den abgeschnittenen Schlüssel und platziere ihn gegen die Lippe des Fernbedienungsteils A. Benutze den Anreißer und markiere das Plastik nachdem du es zentriert hast. (Mach dir noch keine Gedanken über Teil B zu diesem Zeitpunkt)
5 – Cutting the plastic (PIECE A) … BE CONSERVATIVE. Remember that you should be cutting INSIDE the lines you’ve marked. These cuts will effect how well the key mates to the plastic … better too tight than loose [there’s a joke there somewhere !] (don’t want the key to move in the fob when your done).
When I did this I used the #2 xacto knife to start the cuts and establish depth, then I came in with the chisel to dig out (chisel out) the material. Take your time!!
Place the key in the cut from time to time to see how it’s going. When your finished (happy with the cut), leave the key in it’s ultimate location.
5. – Plastikstück A zurechtschneiden…GEHE KONSERVATIV vor. Denk daran, dass du innerhalb deiner Markierungen schneidest. Diese Schnitte beeinflussen, wie gut der Schlüssel im Plastik hält…besser zu fest als zu locker, du willst ja nicht, dass der Schlüssel in der Fernbedienung wackelt, wenn du fertig bist. Als ich das tat, benutzte ich #2 xacto Messer, um mit den Schnitten zu beginnen und die Tiefe zu ermitteln. Dann bin ich mit dem Meißel dran und habe das Material sauber entfernt. Platziere den Schlüssel immer wieder in die Schnittstelle, um die Passgenauigkeit zu prüfen. Wenn du fertig bist (zufrieden mit dem Schnitt), lass den Schlüssel in seiner endgültigen Position.
5a – Cutting the plastic (PIECE B) … With the key installed in piece A, reassemble the fob halves. Ensure they are aligned, and mark fob piece ‘B’ where it comes in contact with the key. This is now the reference point for the cuts to be made on piece ‘B’.
(I believe the Chinese refer to building things this way as ‘Insitu’)
Take the fob apart. Place the key on fob piece ‘B’ and using the reference marks, scribe the plastic. CAUTION – the key may not be symetrical … be sure to put the appropriate side facing fob piece ‘B’. Now whittle out the plastic that needs to be removed …. Remember to stay within the scribe lines .. be conservative.
At this point you should be able to install the key and assemble the fob halves. Depending on how tight you were able to make it, this may be where you want to stop…but I doubt it!
5a. – Plastikstück B zurechtschneiden…Füge die beiden Fernbedienungshälften mit dem Schlüssel in Stück A zusammen. Versichere dich, dass sie genau ausgerichtet sind und markiere an Stück B, wo es mit dem Schlüssel in Kontakt kommt. Dies ist nun dein Referenzpunkt für die Schnitte, die an Teil B zu tätigen sind. Nimm die Fernbedienung auseinander. Platziere den Schlüssel auf Teil B der Fernbedienung unter Beachtung der Markierungen auf dem Plastik. ACHTUNG – der Schlüssel kann asymmetrisch sein…sei dir sicher, dass du die zugehörige Seite von Teil B verwendest. Schnitze nun den Plastikteil, der entfernt werden muss, heraus….denke daran, dass du innerhalb der Markierungen arbeitest
Zu diesem Zeitpunkt solltest du in der Lage sein, den Schlüssel einzusetzen und anschließend die beiden Fernbedienungshälften zusammenzubauen. Abhängig davon wie fest der Schlüssel sitzt, kann dies der Punkt sein, an dem du aufhören möchtest
6 – Fabricate stiffeners for holding everything together more securely.
Use the bolt cutter to cut an old key or coin into the approximate shape to fit inside the ¼ moon opening on the fob. This will end up being 2 small pieces of metal that will be tapered to match the shape of the fob Once their cut initially, use a file or belt sander (what I used) to work the piece until it fits snugly into the ¼ moon openings. This can be tedious but worth the effort.
6 – Herstellung von Befestigungen, um alles sicher zusammenzuhalten. Benutze den Bolzenschneider, um einen alten Schlüssel oder eine Münze in Stücke zu schneiden, die in die Viertelmondöffnung der Fernbedienung passen. Dies endet in 2 kleinen Metallstücken, welche so angeschrägt werden, dass sie zur Fernbedienungsform passen. Nachdem diese einmal geschnitten sind, benutze eine Feile oder Bandschleifer (was ich benutzte), um das Teil so zu bearbeiten, dass es gut in die Viertelmondöffnungen passt. Dies kann ermüdend sein, ist aber den Aufwand wert.
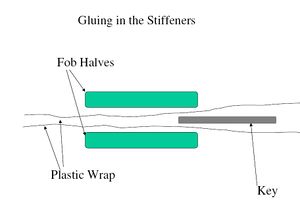
7 – Now you need to glue the stiffeners into the fob halves.
Refer to the ‘Gluing in the Stiffeners’ diagram below. Assemble the fob with plastic wrap inserted between the key and the plastic. This will ensure you don’t ‘glue’ anything together permently.
Using a 2 part epoxy ( I used JB weld ) glue in the stiffeners. Be sure to fill in all the voids and gaps under the stiffener as this will add strength. You might want to do one side at a time to ensure no glue/epoxy gets to the outside of the fob… up to you.
A note about the glue used … this needs to be something thick that won’t run much. JB weld fits the bill here. Another interesting thing about JB weld is that it didn’t stick to the plastic wrap which I thought was curious.
7 – Nun musst du die Befestigungen in den Fernbedienungshälften verkleben. Siehe hierzu „Gluing in the Stiffeners“ Diagramm. Füge den Schlüssel in einer Plastikhülle zwischen die beiden Fernbedienungshälften ein. Dies wird verhindern, dass etwas dauerhaft zusammenklebt. Die Verwendung eines 2-Komponenten Epoxy- Klebers zum Einkleben der Befestigungen wird empfohlen. Sei sicher, dass du in alle Hohlräume unter den Befestigungen ausfüllst, um den nötigen Halt zu gewährleisten. Möglicherweise willst du eine Hälfte nach der anderen machen, um sicherzustellen, dass kein Kleber an die Außenseite der Fernbedienung kommt. Eine Anmerkung zum verwendeten Kleber…er muss dickflüssig sein. JB weld hat sich an dieser Stelle bewährt. Eine andere interessante Sache an JB weld ist, dass er nicht an der Plastikhülle klebte, was ich kurios fand.
8 – With the unit assembled and the stiffeners secured, drill a small hole (appropriate for a 2-56 or equiv machine screw) all the way through the middle of the ¼ moon area piercing the stiffeners. This will be difficult because of the angles involved. Next drill out a slightly larger hole through the top half stiffener down through the body of the fob but DO NOT PENETRATE THE BOTTOM STIFFENER. Next run the 2-56 (or equiv.) tap down through the bottom stiffener.
8 – Mit der zusammengebauten Einheit und den verklebten Befestigungen, bohre ein kleines Loch (passend für 2-56 oder äquivalente Maschinenschraube) durch den Viertelmondbereich. Dies wird aufgrund der Winkel schwierig werden. Als nächstes bohre ein leicht größeres Loch durch die obere Befestigung bis durch den Fernbedienungskörper an sich, aber AUF KEINEN FALL DIE UNTERE BEFESTIGUNG DURCHBOHREN. Als nächstes drehe den Gewindeschneider durch die Bodenbefestigung.
Put in a new screw … install the original screw … tighten everything up and go back to the belt sander ( or fine file ).
Drehe eine neue Schraube hinein…installiere den Originalschlüssel….ziehe alles fest und geh an den Bandschleifer (oder feine Feile).
Sand everything flush.
Schleife alles bündig.
Your Done!
Vielen Dank für die Überstezung an Günther (LT Forum)
--Dieter Siever 09:33, 10. Aug 2006 (CEST)