DWA (Alarmfernbedienung mit integrieten Schlüssel)
Integrated Alarm Fob / KEY for BMW Motorcycle
Dan McGee Nov 18, 2002 mailto:edmcgee@sbcglobal.net


Tools I used / Stuff you’ll need
- Xacto knife w/ #2 blade (classic blade)
- Xacto knife w/ #18 Heavyweight Chiseling blade
- Small Belt sander
- Small drill press
- Pliers
- Small Phillips screw driver
- Plastic Wrap (from the kitchen)
- JB Weld (Made in or near Sulpur Springs Texas ... I don't know what's in JB weld but it's like magic in a tube!)
- Bolt cutter
- An old Brass Key or suitable coin (to fabricate side stiffeners)
- Very small drill bit (for 2-56 tap)
- 2-56 Tap (for making machine screw threads)
- Wallet key for your beemer
- Alarm Fob
- Metal Scribe (small) … could also use an old exacto knife to score metal…just use it backwards.
Time: I did this over the course of 2 weekends and probably worked on it about 2-3 hours (actual work time … I tend to ponder things a lot as I work through issues).
Note: the drill press is optional as is the belt sander. As a hobby I build R/C aircraft and have ready access to these tools. Everything I did can be done with hand tools and a bit of paitence (you’ll need that regardless).
1 - Take your wallet key and put it in the ignition on your bike, turn it to ensure it’s in far enough … now take note of how far it goes in and mark it with the scribe just above the face of the key slot opening.
This will serve as your guide to ensure you leave enough of the key sticking out when your finished (Trust me here).
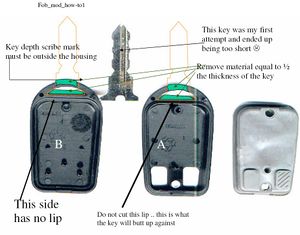
2 – Take the fob (remote) apart and remove the electronics package (Refer to fob_mod_how-to1 below). Place the key with the scribe mark over the button side fob piece (Side A). Next, mark the key so that it can be cut / ground / filed to fit. Use the outside edge of the lip as your guide to mark where to cut the key. Check to make sure you’ve left enough of the key exposed (refer to depth scribe).
3 – Cut the key such that you are left with a straight edge that is square with the key. This edge will rest against the lip on the fob piece with the button holes (piece A) and will act as a reference point for cutting the fob.
4 – Now take the cut key, and placing it againist the lip of fob piece ‘A’, use the scribe (or knife) to mark the plastic after centering it (don’t worry about piece B right now).
5 – Cutting the plastic (PIECE A) … BE CONSERVATIVE. Remember that you should be cutting INSIDE the lines you’ve marked. These cuts will effect how well the key mates to the plastic … better too tight than loose [there’s a joke there somewhere !] (don’t want the key to move in the fob when your done).
When I did this I used the #2 xacto knife to start the cuts and establish depth, then I came in with the chisel to dig out (chisel out) the material. Take your time!!
Place the key in the cut from time to time to see how it’s going. When your finished (happy with the cut), leave the key in it’s ultimate location.
5a – Cutting the plastic (PIECE B) … With the key installed in piece A, reassemble the fob halves. Ensure they are aligned, and mark fob piece ‘B’ where it comes in contact with the key. This is now the reference point for the cuts to be made on piece ‘B’.
(I believe the Chinese refer to building things this way as ‘Insitu’)
Take the fob apart. Place the key on fob piece ‘B’ and using the reference marks, scribe the plastic. CAUTION – the key may not be symetrical … be sure to put the appropriate side facing fob piece ‘B’. Now whittle out the plastic that needs to be removed …. Remember to stay within the scribe lines .. be conservative.
At this point you should be able to install the key and assemble the fob halves. Depending on how tight you were able to make it, this may be where you want to stop…but I doubt it!
6 – Fabricate stiffeners for holding everything together more securely.
Use the bolt cutter to cut an old key or coin into the approximate shape to fit inside the ¼ moon opening on the fob. This will end up being 2 small pieces of metal that will be tapered to match the shape of the fob Once their cut initially, use a file or belt sander (what I used) to work the piece until it fits snugly into the ¼ moon openings. This can be tedious but worth the effort.
7 – Now you need to glue the stiffeners into the fob halves.
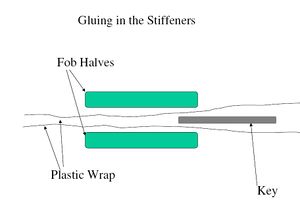
Refer to the ‘Gluing in the Stiffeners’ diagram below. Assemble the fob with plastic wrap inserted between the key and the plastic. This will ensure you don’t ‘glue’ anything together permently.
Using a 2 part epoxy ( I used JB weld ) glue in the stiffeners. Be sure to fill in all the voids and gaps under the stiffener as this will add strength. You might want to do one side at a time to ensure no glue/epoxy gets to the outside of the fob… up to you.
A note about the glue used … this needs to be something thick that won’t run much. JB weld fits the bill here. Another interesting thing about JB weld is that it didn’t stick to the plastic wrap which I thought was curious.
8 – With the unit assembled and the stiffeners secured, drill a small hole (appropriate for a 2-56 or equiv machine screw) all the way through the middle of the ¼ moon area piercing the stiffeners. This will be difficult because of the angles involved.
Next drill out a slightly larger hole through the top half stiffener down through the body of the fob but DO NOT PENETRATE THE BOTTOM STIFFENER.
Next run the 2-56 (or equiv.) tap down through the bottom stiffener.
Put in a new screw … install the original screw … tighten everything up and go back to the belt sander ( or fine file ).
Sand everything flush.
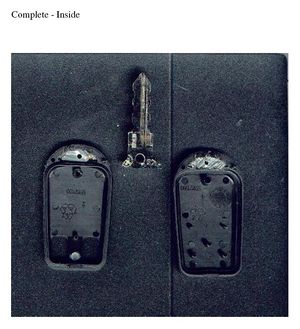
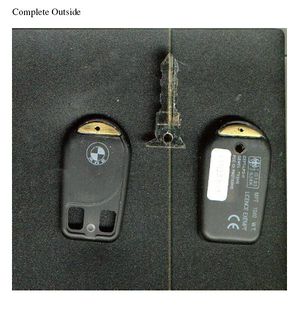
Your Done!
--Dieter Siever 09:33, 10. Aug 2006 (CEST)